Table of contents

Want your Instagram profile to stand out? Start by designing custom Highlight Covers that reflect your brand. These round icons below your bio are like a navigation menu for visitors, showcasing key content like FAQs, products, or behind-the-scenes moments.
Using AI tools like Canva AI, ArtSmart.ai, and Adobe Express, you can create professional, on-brand designs in minutes. Here's a quick overview:
- Why It Matters: Profiles with consistent Highlight Covers get 28% more visits.
- AI Tools: Generate ready-to-use designs with simple prompts (e.g., "minimalist coffee cup icon").
- Steps:
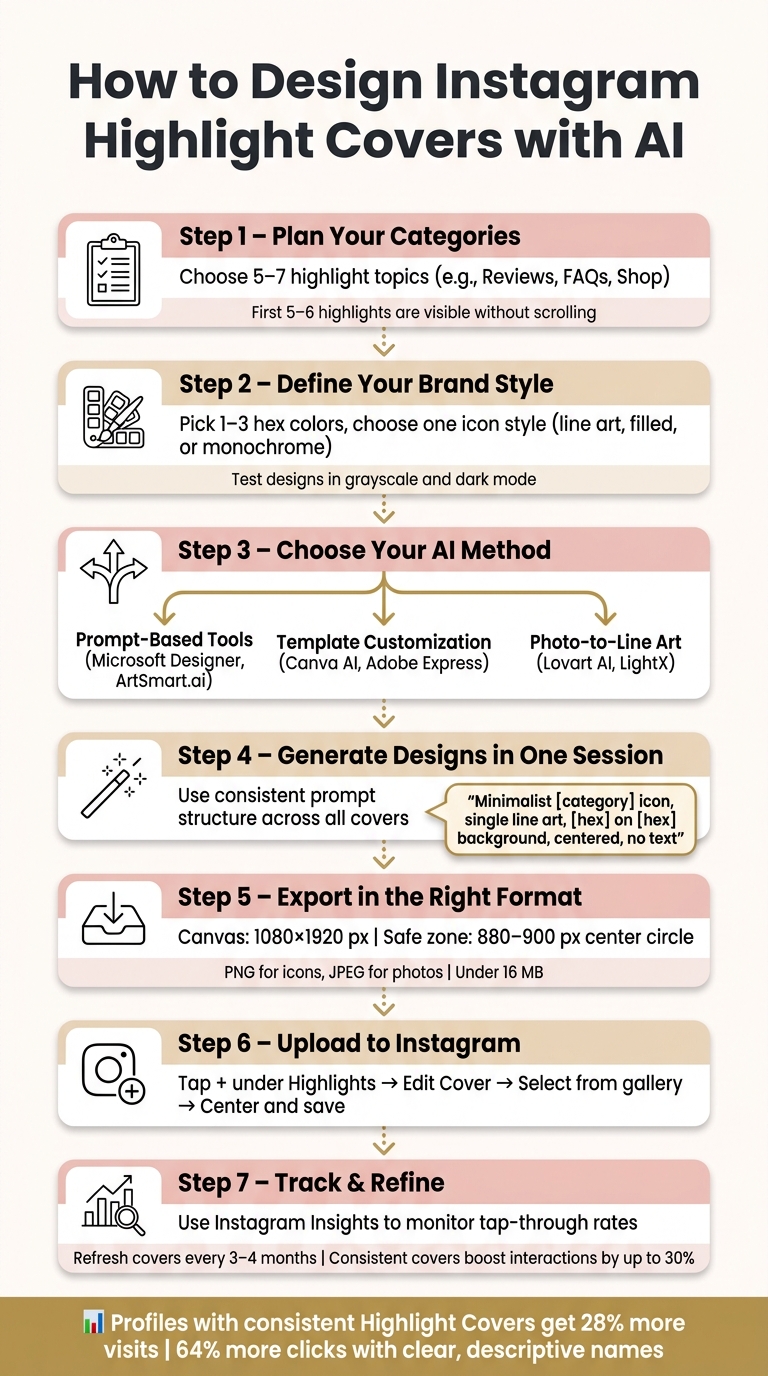
- Decide on 5–7 key categories (e.g., Reviews, FAQs).
- Match colors and styles to your Instagram aesthetic.
- Use AI tools to create and refine your designs.
- Upload them to Instagram, ensuring proper sizing and alignment.
AI makes it easy to create visually appealing, organized covers that enhance your profile’s appeal. Let’s dive into the details.
Getting Ready to Design Highlight Covers with AI
Choosing Your Highlight Categories
Before diving into any AI tool, take a moment to decide on your highlight topics. Start by auditing your Stories archive - look for recurring themes or posts that generated high engagement. Then, match these themes to specific goals, like driving sales, building trust, or answering common questions.
A good guideline is to stick with 5–7 highlights. This range allows you to cover your main topics without overwhelming your profile. Keep in mind that only the first 5–6 highlights are visible without scrolling, so prioritize your most important categories at the front.
| Category | Content Examples | Goal |
|---|---|---|
| About / Story | Brand mission, team intros | Build trust |
| Products / Services | Offerings, pricing, new arrivals | Drive sales |
| Reviews | Testimonials, user-generated content | Build authority |
| FAQs / Resources | Common questions, tutorials | Reduce friction |
| Behind the Scenes | Process, day-in-the-life content | Community building |
When naming your highlights, make them action-oriented. For instance, use labels like "Shop Now" or "Book a Session" instead of generic terms like "Products." Research shows that 64% of visitors are more likely to click on highlights with clear, descriptive names.
Once your categories are set, the next step is to align these choices with your brand's overall visual style.
Defining Your Brand Style
Your highlight covers should seamlessly blend with your Instagram feed, not stand out awkwardly. To achieve this, focus on four main elements: color, icon style, spacing, and background texture.
For colors, pull hex codes directly from your profile photo or your most-used feed tones. Stick to 1–3 complementary shades for a clean and cohesive look. When it comes to icons, choose one style - whether it’s line art, filled shapes, or monochrome - and keep it consistent across all covers.
"Highlight covers should visually connect with your feed, not compete with it." - Malet Photo
Test your designs in grayscale and against both white (#FFFFFF) and black (#000000) backgrounds to ensure they’re easy to see, even in dark mode.
Building a Design Plan
With your categories and brand style finalized, it’s time to create a design strategy. Draft a creative brief that outlines your choices for color, icon style, background texture, and the overall mood you want to convey. Include specific details like hex codes, icon preferences, and stylistic descriptors (e.g., "warm and minimal" or "bold and tech-forward").
This preparation is key because you’ll want to create all your covers in one session. Using the same prompt or template ensures a consistent look across your profile, giving it a polished, intentional feel. As Theodore Moulos of GrowthRocks explains:
"A brand isn't built on randomness. It's built on consistency. Every post is one brick in a larger narrative."
When designing, use a 1080×1920 px canvas and keep essential elements within a central circle of 880–900 px in diameter to avoid cropping issues.
sbb-itb-3c55afb
How to Create Highlight Covers for Instagram Stories on Canva
Step-by-Step: Designing Highlight Covers with AI Tools
How to Design Instagram Highlight Covers with AI: Step-by-Step
Once you've defined your brand style, it's time to design your highlight covers. AI tools make this process easier with three main approaches: prompt-based generation, template customization, and photo-to-line art conversion. Choose the method that best matches your skills and brand vibe, and let the tools do the heavy lifting.
Using Prompt-Based AI Design Tools
Prompt-based tools like Microsoft Designer (free) and ArtSmart.ai (starting at $19/month) allow you to create custom icons from simple text descriptions - no design experience required.
Here's how to get started:
- Open the tool and create a new image generation project.
- Enter a detailed prompt. For example: "A minimalist icon of a steaming coffee cup, single line art style, white icon on a solid beige background, centered, no text."
- Review the generated options, pick the one that fits your brand, and refine it using the editor if needed.
- Export the final design as a PNG file (1080×1080 px) for optimal quality.
To keep your covers consistent, generate all of them in one session. Use the same prompt structure but swap out the icon subject (e.g., "shopping bag" for a Shop cover or "speech bubble" for a Reviews cover). This ensures your designs remain cohesive.
If starting with a blank canvas feels overwhelming, AI-powered templates might be a better fit.
Customizing Templates on AI-Powered Platforms
Platforms like Canva AI and Adobe Express simplify the process with pre-built templates that you can tweak to match your brand. Both offer free options, while Adobe Express includes advanced branding tools in its paid plan.
Here’s how to customize templates effectively:
- Replace default colors with your brand's specific hex codes.
- Swap out icons to align with your preferred style.
- Avoid adding text, as highlight covers are displayed at around 60–70 pixels on mobile screens - making text hard to read.
As Liz Mosley, owner of Liz Mosley Design, shares:
"I use Adobe Express to create and schedule a lot of my own content, which is essential for crafting engaging Instagram posts, and by creating templates for my own brand I have saved myself hours marketing my business!"
Stick to a consistent icon style and limit your color palette to one to three tones. This will maintain the cohesive look you established during the planning phase. Avoid mixing styles - like combining filled icons with line art - as it can disrupt the overall harmony.
Turning Photos into Line Art with AI
For a distinct look, you can convert photos into line art. Tools like Lovart AI and LightX analyze an image's edges and contours, stripping away color to create clean, monochromatic linework.
Here’s how to do it:
- Start with a high-contrast photo with a simple background for better edge detection.
- Adjust the photo's brightness and contrast for clarity before uploading.
- Use a descriptive prompt like "simple pencil line art with clean outlines and minimal shading" to guide the style.
"By stripping an image down to its core lines, you make it incredibly versatile." - ColorPageAI
Once the line art is generated, use the editing tools to clean up stray pixels and adjust line thickness. Export the final design as a PNG to preserve quality and avoid compression issues that can occur with JPEGs.
These AI tools make the process of creating highlight covers not only efficient but also tailored to your brand's unique aesthetic.
Uploading and Setting Up Covers on Instagram
Once you've created your highlight covers using AI, here's how to ensure they look great on Instagram. Follow these steps to export, upload, and fine-tune them for the best results.
Exporting Covers in the Right Format
Before uploading, make sure your files meet Instagram's specifications. The ideal canvas size is 1080 × 1920 pixels with a 9:16 aspect ratio - this matches the dimensions of an Instagram Story. Instagram will crop this vertical image into a circle for your profile, focusing on the center 1080 × 1080 square.
To avoid important parts being cut off, keep your design within a centered safe zone of 880–900 pixels. Since highlight covers are displayed at about 115 × 115 pixels on most mobile screens, opt for simple, bold designs that remain clear even at smaller sizes.
For file types, consider:
- PNG: Best for icons with sharp edges or transparency.
- JPEG: Ideal for photographic designs.
Also, stay organized with file size and naming:
- File size: Keep it under 16 MB.
- Filenames: Use clear, descriptive names like "IG_Highlight_Shop.png" or "IG_Highlight_Travel.png" for easy identification.
Adding Covers to Instagram Highlights
Uploading custom covers is simple and can be done directly from your camera roll.
For a new highlight:
- Tap the "+" button under Story Highlights on your profile.
- Choose the Stories you want to include, then tap Next.
- Select Edit Cover and pick your design from the gallery.
- Adjust the image, name the highlight, and tap Add.
To update an existing highlight:
- Long-press the highlight on your profile (or tap it and select More).
- Choose Edit Highlight > Edit Cover.
- Tap the gallery icon, select your new cover, adjust its position, and tap Done.
During the cropping step, pinch to zoom or reposition the image to ensure your icon is perfectly centered.
Testing and Updating Your Covers
Once your covers are live, check how they look on your profile. A polished, cohesive appearance is key. View your covers in both light and dark modes, as Instagram's dark mode can make low-contrast designs blend into the background. If your icon fades or is hard to see, adjust the contrast and re-upload.
Refreshing your covers occasionally can keep your profile looking updated. A well-maintained, cohesive set of highlight covers can boost profile interactions by up to 30%. Use Instagram Insights to monitor which highlights get the most attention, and use that data to refine your designs over time.
Best Practices and Fixes for AI-Designed Highlight Covers
Keeping a Consistent Look Across All Covers
When creating highlight covers, consistency is key. Instead of designing them one at a time, generate the entire set in a single session. Use the same base prompt and a master template to keep elements like borders, background colors, and alignment consistent across all covers. This ensures a uniform structure throughout your profile. Stick to one icon style - whether that's minimalist line art, solid shapes, or 3D icons. Mixing styles can disrupt the visual harmony of your profile.
A structured AI prompt can make all the difference. For example: "Minimalist [category] icon, single line art style, [hex code] on [hex code] background, centered, no text, high resolution." Use a color picker to extract exact hex codes from your existing posts for a perfect match, rather than relying on guesswork.
Fixing Common AI Design Problems
Even with a solid design plan, AI-generated covers can sometimes have flaws. Here’s how to address the most common issues:
- Excessive Detail: AI tools often create intricate designs that look great when enlarged but lose clarity at thumbnail size. Check if your icons are recognizable when viewed small. If not, simplify the design by using bold shapes or a single clear element like thick sans-serif text.
- Edge Clipping and Color Inconsistencies: To avoid clipped edges, ensure all key elements are centered within a safe zone. Test your designs at smaller sizes before uploading. For consistent colors, always use exact hex codes for your palette.
Using Analytics to Improve Your Covers Over Time
Your highlight covers shouldn’t be static elements - they should evolve alongside your profile. Use Instagram Insights to monitor performance. For instance, track which highlights get the most taps and position these in the first five slots, as they’re the most visible on most devices. If a highlight has a high exit rate (users leaving after the first story), it might signal issues with the design or labeling.
UpGrow’s real-time analytics dashboard is a powerful tool for connecting design tweaks to engagement shifts. If you update your covers and see an increase in profile visits or interaction rates, it’s a clear sign the changes paid off. Regular audits every three months help ensure your covers reflect your brand and content direction. Profiles that refresh their covers every 3–4 months may also see a boost in visibility, as Instagram favors accounts with consistent activity.
| Instagram Metrics to Track | What It Tells You | Action to Take |
|---|---|---|
| Tap-through rate | Which categories attract the most interest | Move top performers to the first 5 slots |
| Profile interaction rate | How effective your first impression is | Refresh covers if engagement drops |
| Visit duration | Whether users explore or leave quickly | Simplify designs to improve navigation |
Conclusion and Next Steps
Key Takeaways
Instagram highlight covers play a crucial role in shaping how visitors perceive your profile. Think of them as your profile's visual navigation bar, guiding visitors and giving your page a polished, intentional feel.
"A profile with thoughtful highlight covers feels intentional and trustworthy. A profile with default cover thumbnails... reads as low-effort." - ViewIGStory
Thanks to AI tools, creating professional-quality designs is now within everyone's reach. These tools can help you craft a cohesive set of covers in minutes. Use AI as your creative jump-off point - build a base, then tweak the designs to match your brand's personality.
Armed with these tips, you're ready to take action and elevate your profile.
Begin, Test, and Refine
Start by identifying 5–7 key highlight categories. Then, lock in your brand colors using precise hex codes from your existing content and design your entire set in one go to keep the look consistent. After updating your covers, use tools like UpGrow's analytics dashboard to track changes in profile visits or engagement. This data-driven approach helps you fine-tune your strategy over time. This is a key part of a successful Instagram marketing strategy. For a fresh look, consider updating your covers seasonally - 2 to 4 times a year should do the trick.
"AI has become a valuable assistant for Instagram creators, simplifying highlight cover design and ensuring visual consistency across profiles." - ArtSmart.ai
FAQs
What’s the best AI prompt to keep all my highlight icons consistent?
To keep your Instagram highlight covers visually cohesive, use a prompt that clearly defines one aesthetic, a specific color palette, and a consistent icon style. For instance: "Design minimalist Instagram highlight covers using [Color 1] and [Color 2], with simple line art icons representing [Category A], [Category B], and [Category C]."
You can also include a reference image, such as your brand logo, to guide the AI in matching the texture and colors for a unified look.
How do I make sure my cover doesn’t get cropped in the Instagram circle?
To make sure your design fits perfectly, start with a 1080x1920 pixel canvas. Instagram highlights the center 1080x1080 square with a circular mask for profile covers. To keep important elements like text or icons fully visible, position them within a centered safe zone of 700–880 pixels in diameter. This way, your design remains intact and unclipped on different mobile screens.
How often should I refresh highlight covers, and what metrics should I watch?
Updating your Instagram highlight covers can make a big difference when launching a new campaign, rebranding, or giving your profile a fresh look. It’s a good idea to update these covers at least every few months to keep things current. While there aren’t specific metrics to measure the performance of highlight covers alone, you can track overall profile engagement to see if they’re making an impact.
Well-designed, consistent, and clear covers do more than just look good - they help users navigate your profile easily and can strengthen their trust in your brand.